
![]()
![]() Oooh, the cliff dwellings of Mesa Verde—if you’ve dreamed of visiting since you were a kid, like me, and you’re finally going—yay! Nothing can compare to visiting in person and wandering around the ruins where the Ancient Ones once lived centuries ago. But I will admit that it’s NOT an easy place to photograph. In this post I’ll share tips and examples for photographing Mesa Verde cliff dwellings, and even post-processing tips so that when you return home your images can convey the mystery and intrigue you felt when you were exploring this place!
Oooh, the cliff dwellings of Mesa Verde—if you’ve dreamed of visiting since you were a kid, like me, and you’re finally going—yay! Nothing can compare to visiting in person and wandering around the ruins where the Ancient Ones once lived centuries ago. But I will admit that it’s NOT an easy place to photograph. In this post I’ll share tips and examples for photographing Mesa Verde cliff dwellings, and even post-processing tips so that when you return home your images can convey the mystery and intrigue you felt when you were exploring this place!
5 CHALLENGES of photographing Mesa Verde Cliff Dwellings
1. Contrasty light.
The biggest challenge of photographing the cliff dwellings has to be that contrasty light!
Ruins themselves are often partially hidden among the rocks under overhangs whereas the sandstone cliffs and walkways are exposed to the sun. Trying to photograph these scenes result in images with overexposed, bright brights and underexposed, dark darks when the harsh unfiltered sun is directly overhead.
But, why? It didn’t look that bad in person!
That’s because our eyes can see a greater range of light, anywhere from 10-14 f-stops, but our cameras have a limited dynamic range of 5-7 (compact cameras) or 8-11 f-stops (using digital SLR/mirrorless cameras). This causes any exposed sandstone walls to be bright, overexposed and blown-out while the ruins tucked deep into the recesses of the alcoves disappear into the shadows like the Anasazi themselves.
2. Restricted access to ruins & observation decks.
The Cliff Palace loop road opens at 8am and closes at dusk. This restricts you to shooting distant views of Cliff Palace during those times as the observation platform at Cliff Palace and Sun Point View terrace (across the canyon) are located on this one-way road which takes about 45 minutes to drive. So forget any ideas about trying to capture night skies above the ruins. Sadly, no Milky Way shots are possible for any ruin site in the park. Oh, and by the way, there’s no overlook or viewing platform of the Balcony House, just a distant view from the 1.5 mile hiking trail to Soda Canyon.
As for taking wandering around on your own and taking your time to compose images of either the Cliff Palace or the Balcony House ruins, note that both are limited. Access is possible only by taking a guided hour-long tour. At Cliff Palace, tourists follow the park ranger on the walkway at the base of the ruin, congregate around a kiva then get in line to take a quick peek inside a window to see faded remnants of geometric artwork on a wall before climbing ladders to exit. There’s little wandering around allowed and certainly no access to the upper recesses—unfortunately! So try to inhibit your desire to sneak away despite the great temptation. Balcony House does offer more opportunity to explore around on your own but it is a much smaller site.
3. Limited time at the ruins.
Actual time spent at each ruin is about 40 minutes total, as the other 20 minutes is spent getting to and from the site (walking/ladders) on the hour-long guided tour.
4. Too many people in my shot!
This is to be expected when up to 50 people can join a tour.
5. Difficult shots to compose.
The ruins are amazing to visit, but not so easy to capture.
Examples of that ugly Contrasty Light.
Since this is the great offender, let’s look at what NOT to capture.
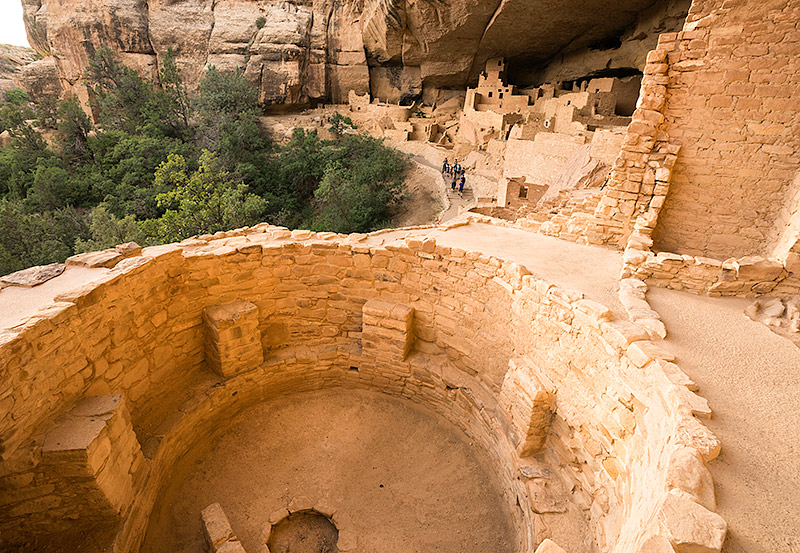
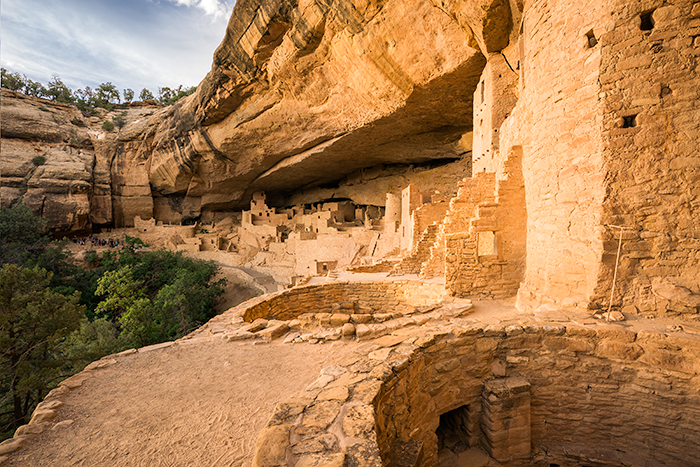
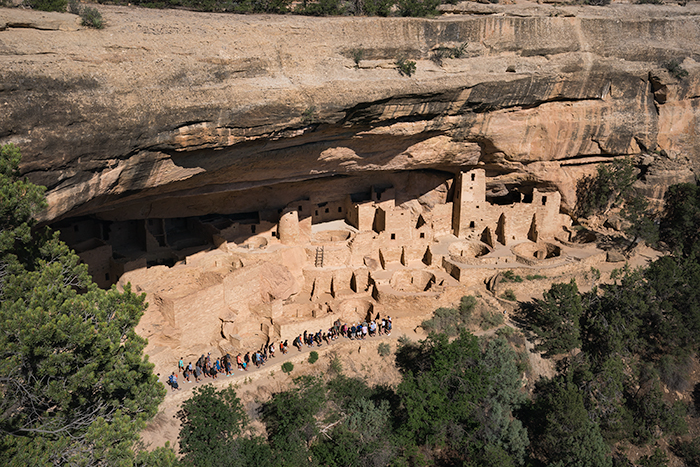
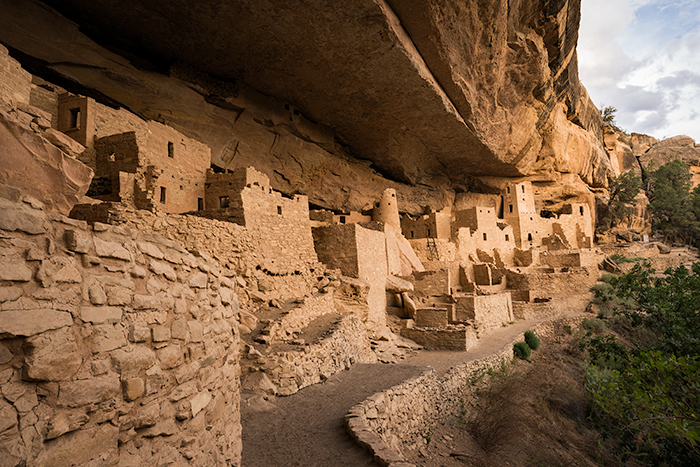
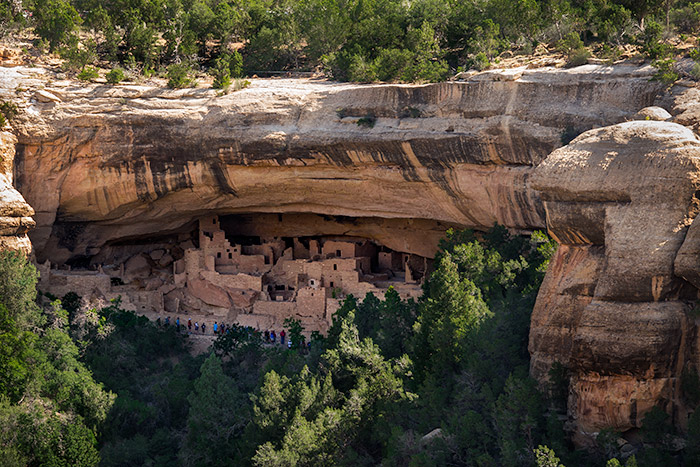
Everybody wants that classic shot showing the long row of cliff dwellings wedged between rocks up in the cliffs of a canyon. But that grand overview is very difficult to capture unless you shoot at the right time of day. Which is certainly NOT at midday, like these!
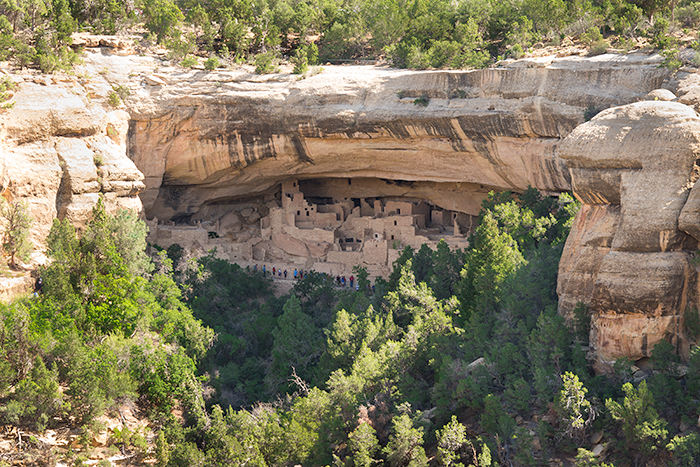
Cliff Palace from across the canyon
Even narrowing the shot doesn’t always work because a typical scene most summer days is half in the sun and half in the shadows.
yuk…totally useless
If you use spot metering and expose +1 on the bright sandstone ruins sitting in direct sunlight, they will be perfectly exposed but— the cliff dwellings further back under the overhang will go dark to completely black because the camera simply cannot process both bright and dark parts of a scene like our eyeballs can.
yeah, not a keeper either!
Ah, I know what you’re thinking. Just bring a tripod, take 2 shots (exposing for the brights in one shot, and the darks in the other) and combine them together later in PhotoShop. You could.
But I didn’t bother—at least on a tour. It was too much of a hassle. You’re moving at a brisk pace, following a guide, and only have about 40 minutes at the ruin. Plus, you need both hands free for climbing ladders—several of them—which means packing it up to carry on your back each time.
![]()
![]() Nope, not really conducive to using on tours—setting up, packing up, and moving along with 49 other people in the same narrow space. So, what do you do???
Nope, not really conducive to using on tours—setting up, packing up, and moving along with 49 other people in the same narrow space. So, what do you do???

See how contrasty it is?… And this was taken late in the day, at 5:30pm!
10 Tips for photographing Mesa Verde Cliff Dwellings
1. Focus on features within an evenly lit space
Instead of trying to capture an entire cliff dwelling when the sun is shining overhead, choose a scene where everything in your frame is in the sunlight, everything is lit from reflected light, or everything is in the shadows. A scene where everything is evenly lit.
Compare the shot directly above (contrasty) to the one below (evenly lit).
In the shot below, the ruins were tucked deep within the alcove. No direct sun. Instead they were beautifully, evenly lit by reflected light bouncing off of the sandstone rocks. Same place, same afternoon, the shots were taken 9 minutes apart. Spot the ruins in the far back (photo above)? I simply isolated them in the 2nd shot by changing to a longer, 85mm lens so I could eliminate the harsh contrasty light in the foreground, and metered +1 on the evenly lit scene.
![]()
![]()
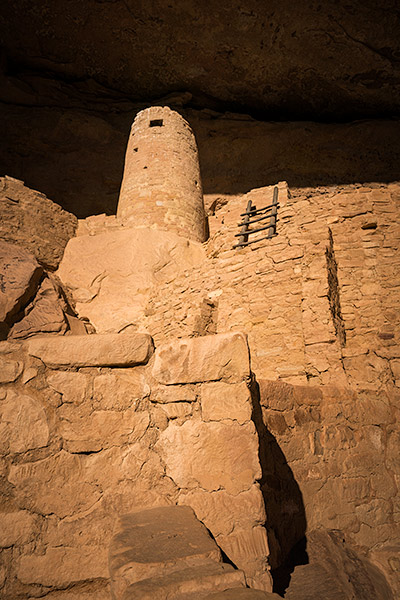
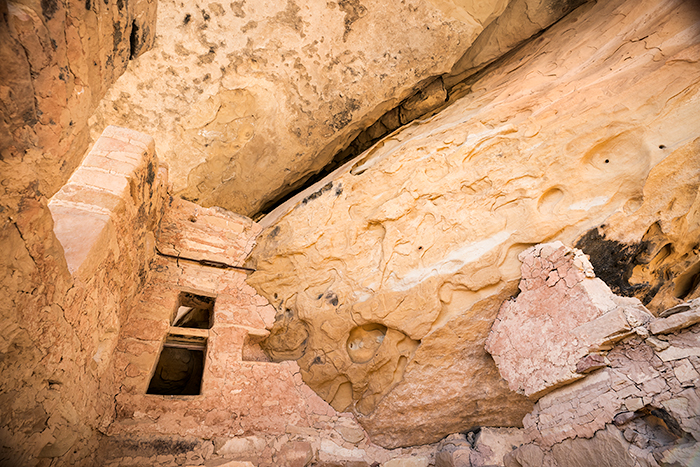
Or zoom in to isolate a subject from the contrasty (too-light/too-dark) background and let a specific structure, such as a tower, a doorway, tunnel or window fill your frame.
![]()
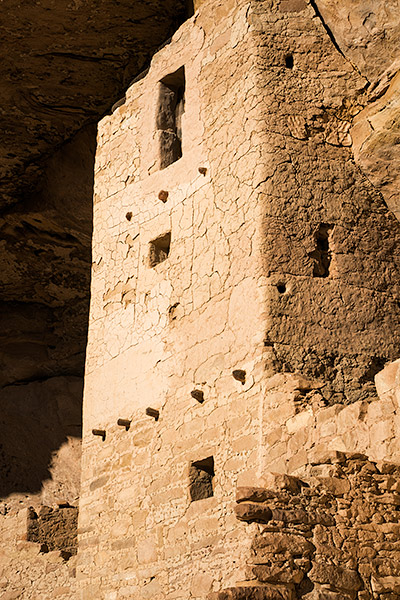
![]() Or just focus on a detail…like this top part of a tower.
Or just focus on a detail…like this top part of a tower.
![]()

![]()
2. Choose which cliff dwelling ruin to shoot, and when!
Depending on the direction they face, the structures could be sun, shadows or half and half. It matters!
Morning: Balcony House. Get there as early as you can. This small ruin site faces east. Dawn would be a beautiful time to go! If you’re lucky enough to visit in June or September check out the availability for the sunrise tour (see more below). During the rest of the summer the earliest tour departs at 7am daily. Which is the one we joined. But look how harsh the sun already was by 7:30am in late July! Deep shadows on the floor were from people standing nearby.
![]()
![]()
Mid-morning alternative: photograph Square Tower House ruin from the observation spot off of Mesa Top Road. Reflected light from opposite canyon walls create pinkish yellow pastel-colored tones in the morning light. Shadows are much softer. (I actually preferred this to the more dramatic golden sunset shots.)
To me, the colors, tones and textures are more pleasing and distinct.
![]()
![]()
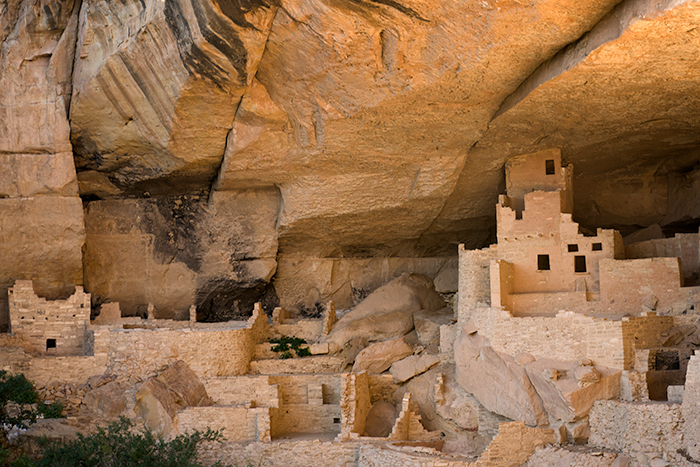
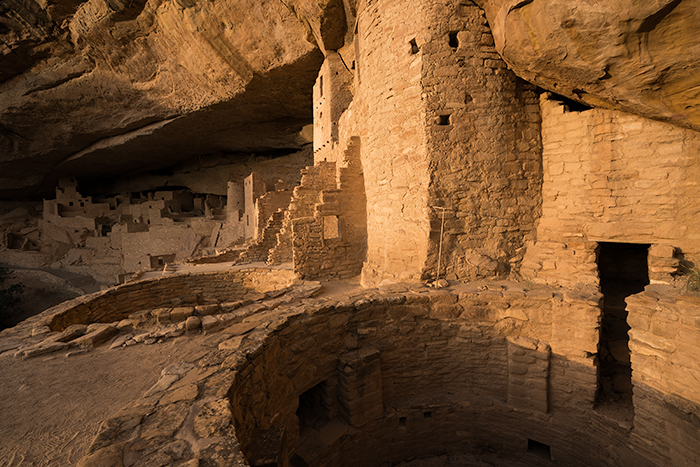
Late afternoon/sunset: Cliff Palace. Wait till the sun goes lower to photograph this jewel of the park. Reserve tickets for the last tour of the day, or capture a grand scenic overview from Sun View terrace across the opposite canyon with a telephoto lens. Bring a tripod and a long 100-300 mm telephoto lens, not a wide angle lens as I’ve seen some websites recommend (you lose your subject completely!). If you only have a medium telephoto, zoom your lens to 70mm and take multiple vertical shots on a tripod (moving left to right) and stitch them together later in PhotoShop to create a panoramic view of the scene, to see the ruins in situ, nestled in the clefts of the sandstone cliffs.
Twilight tour Cliff Palace, 7:38pm…still a little contrasty trying to shoot a wider scene.
![]()
![]() Contrast this shot taken at 7:30pm on the Twilight Tour with the shot below taken at 6:12pm the night before on the Cliff Palace tour. Amazing difference in light!! Right?
Contrast this shot taken at 7:30pm on the Twilight Tour with the shot below taken at 6:12pm the night before on the Cliff Palace tour. Amazing difference in light!! Right?
![]()
![]()
Sunset location: Square Tower House, like Cliff Palace, turns golden in the late afternoon. Use a 70-400 mm telephoto lens to shoot this cliff dwelling from a high vantage point accessed a short walk from the road. The observation spot is well marked on Mesa Top Road.
Seasons: Prime time to visit is probably early spring or late fall when the sun is lower in the sky and the light is less contrasty. Guided tours operate from May until September. Or consider visiting in winter when the light is even more diffused. In winter, guided tours are limited to the Spruce House (closed until stabilized). Telephoto lenses are needed for capturing the Cliff Palace and Square Tower ruins from observation points on Chapin Mesa Road. (Wetherill Mesa region of the park is open May-October, limiting visits to Long House and Step House ruins.)
3. Book special tours on line.
Most people don’t know these tours even exist until arriving at the visitor center, but by then it’s too late. They sell out FAST. Sometimes months in advance. This is probably the best tip for photographers that I can share! Tours are limited to just 10-25 people. So choose your date and book your spot as soon as you can. On these early morning or late afternoon tours the quality of light is softer, producing richer tones and textures within a smaller dynamic range.
taken at 7:30pm…the contrasty light is gone!
Twilight Tour of Cliff Palace offered at 7:15pm (May 25-July 20) and 6:45pm (July 21-Sept 7). Limited to just 15 people. $20 per person is well worth it! Plus, if you’re lucky the guide will let you roam around on your own to shoot instead of hanging around with others listening to his spiel. (Or maybe it was because I raised my hand and answered, yes, I had taken this tour before—in fact, the night before!)
Sunrise Tour at Balcony House is only offered 4 times a year during summer solstice (June 20 & 21) and fall equinox (Sept 21 & 22). Limited to 25 people. $20 per person.
Ranger-led Hikes to Oak Tree House and Square Tower House depart select summer mornings at 8am on a 2 hour strenuous trail to respective cliff dwellings. Limited to 10 people. $25 pp. Can’t speak for the Oak Tree House, but mid-morning would be a great time at Square Tower House if you like ruins evenly lit with pastel colors. Plus, it’s a great chance to go where most don’t!
These special tours can be reserved online (www.recreation.gov) or by calling 877-444-6777.
4. Know where you CAN wander freely!
Although tours are required for the main cliff dwelling sites Cliff Palace, Balcony House, and Long House, there are 2 places where there’s no restricted access. Yes, really!
Spruce Tree ruin site (visible behind the museum on Cliff Palace Road) can be accessed after steep half-mile hiking trail. This is the park’s best preserved site making it a great choice to see firsthand the stone niches that make up the 130 rooms and 8 kivas in this cliff dwelling. However, it is currently closed due to rock falls with no word yet when it will re-open. Workers plan to keep stabilizing the cliff face above the site throughout 2019. This is the only cliff dwelling in the park that is open in the winter, but is by ranger led tour only during those months. The rest of the year (when re-opened) tourists are free to explore and photograph on their own.
Step House cliff dwelling is farther away, located in in Wetherill Mesa (a hour’s drive from the museum at Cliff Palace Road). A steep 1 mile hiking trails leads to this site which has pit houses and a cliff dwelling inside an alcove. Rangers on-site. Open in summer only, from Memorial Day to Labor Day. Allow 1-2 hours. Morning is the preferred time to visit as the ruin is completed shaded by afternoon.
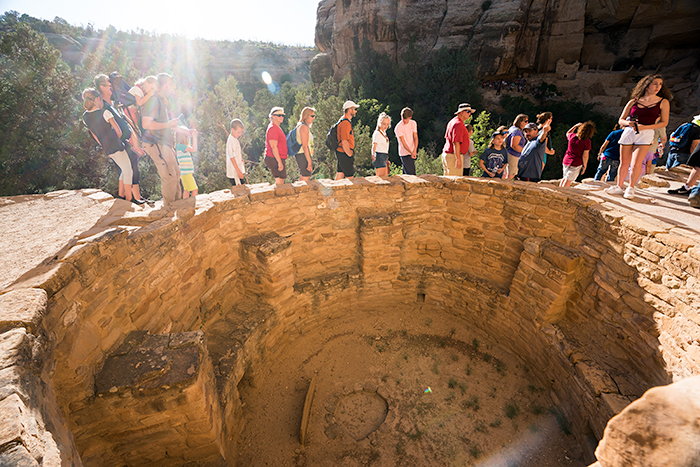
5. REMOVE people from cliff dwelling shots.
I’m not talking about cloning them out in PhotoShop (although that’s always an option!).
Tours for Cliff Palace depart every 30 minutes from 8am to Twilight. That’s a lot of people filing through the ruins. But….there IS a short space of maybe 5 minutes BETWEEN tours when you can photograph the ruin people free. You can do this from the observation deck where people gather for tours (descend stairs from the parking lot). This vantage point looks down on the ruins. (Yes, there’s people in this shot. I was heading down in the next tour group so couldn’t wait around to shoot it people-free. But you can!)
![]()
![]()
OR, if taking a guided tour to Cliff Palace be FIRST IN LINE. Stick close to the guide, descend all the stairs and follow the trail to the spot where the guide tells you to wait for the others. You’ll see the ruins at ground level, and watch the last guided group walking away. Get your camera ready, and click away! This is your best chance to see an overview of the ruins without people walking along the base.
![]()
![]()
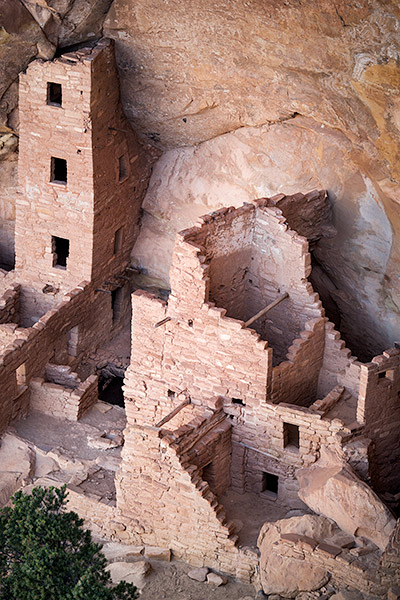
Alternatively, during the tour, use a telephoto lens to zoom in on a group of ruins situated farther away in the recesses of the alcove (like my shot above). Or isolate a structure like a window in a textured rock wall or a fortified tower instead of capturing the whole scene.
![]()
![]()
Or photograph the ruins at Square Tower where no one can wander (except the few who sign up for 8am guided hike tour 3x a week).
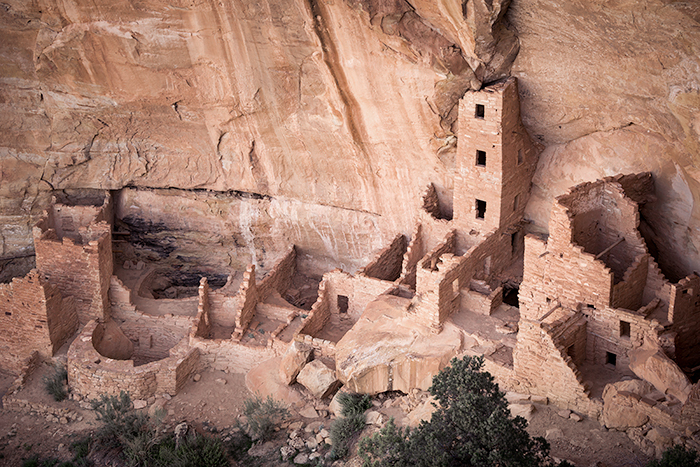
Square Tower House from observation area, 70mm
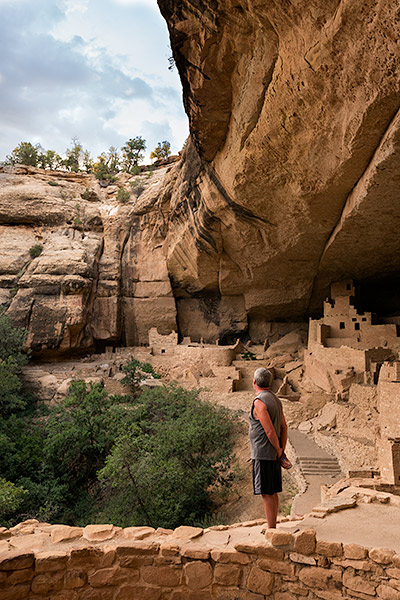
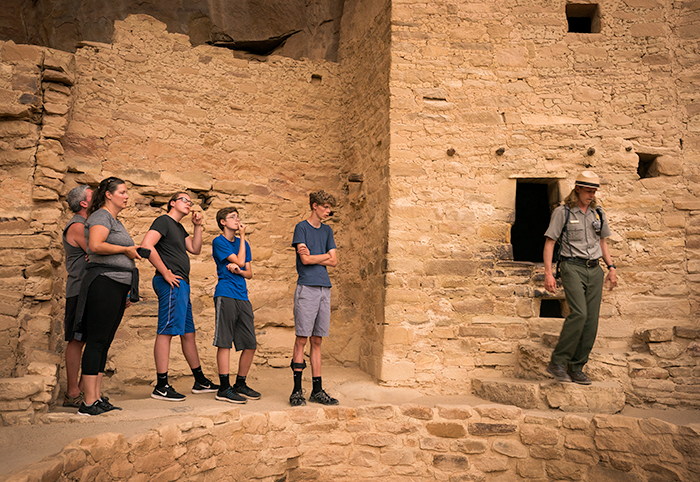
6. INCLUDE people in your cliff dwelling shots.
Look at the shot above. Imagine if that shot had Ancient Pueblo people in it going about their everyday life, grinding corn, climbing up the tower to grab something from storage, children running around…that would certainly add life and meaning! We’re curious about those Ancient Ones, aren’t we? That’s why we visit, to see where they lived and try to imagine their existence.
So why not show that curiosity?
Be aware of the people around you, and try to capture them lost in thought…
![]()

![]()
wondering…imagining…
![]()
![]()
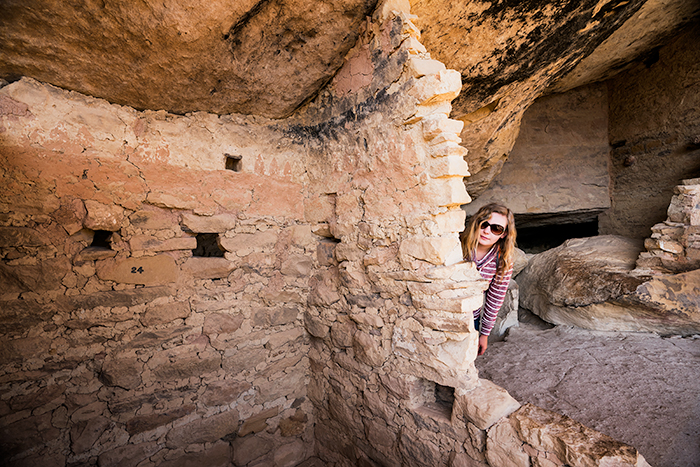
peering…
![]()
![]()
and even thinking about what the guide must’ve just said…
![]()
![]()
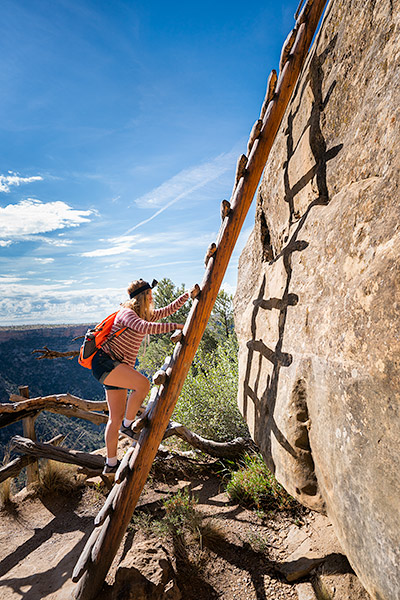
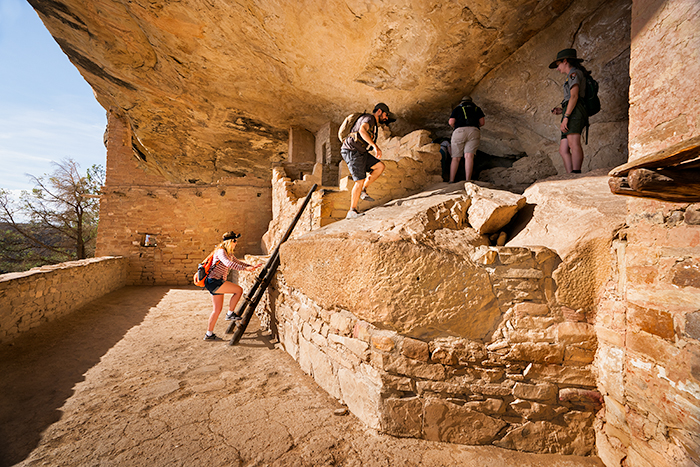
And how about showing people exploring the ruins?
![]()
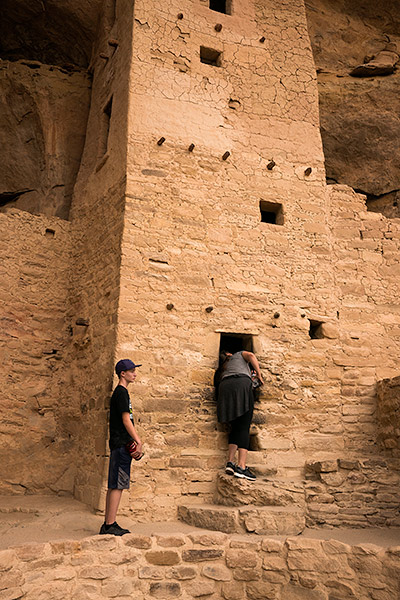
![]() Crawling through tunnels at Balcony House ruins…or pretending to choose your room…
Crawling through tunnels at Balcony House ruins…or pretending to choose your room…
![]()
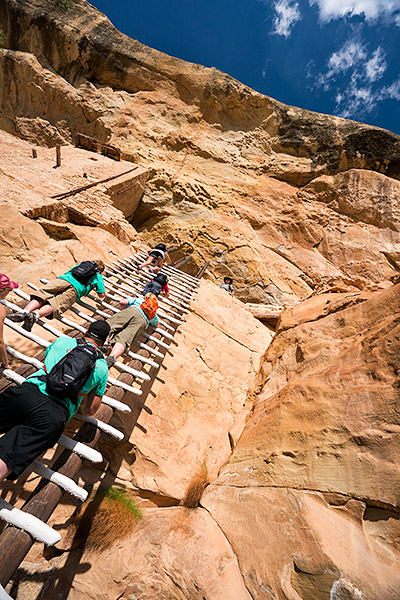
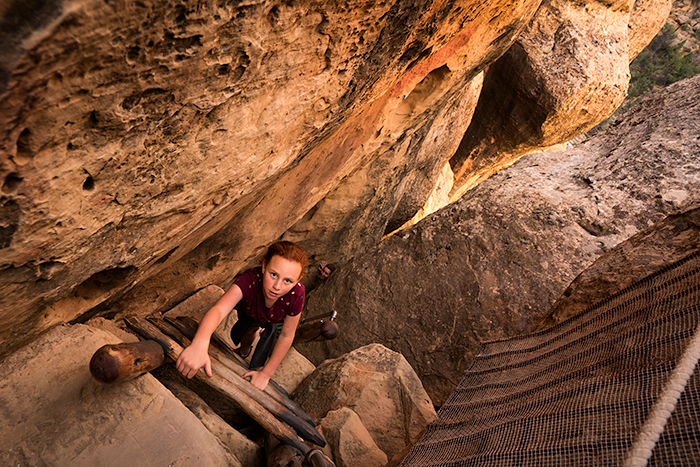
![]() Climbing the 32 foot ladder to reach the Balcony House cliff dwelling…
Climbing the 32 foot ladder to reach the Balcony House cliff dwelling…
![]()
![]()
Balcony House Mesa Verde
![]()
![]()
climbing ladder at Cliff Palace
And then of course there’s the posed portrait. Why not include your travel buddy in the shot to show her admiring the site instead of cheesy smiles aimed at the camera?
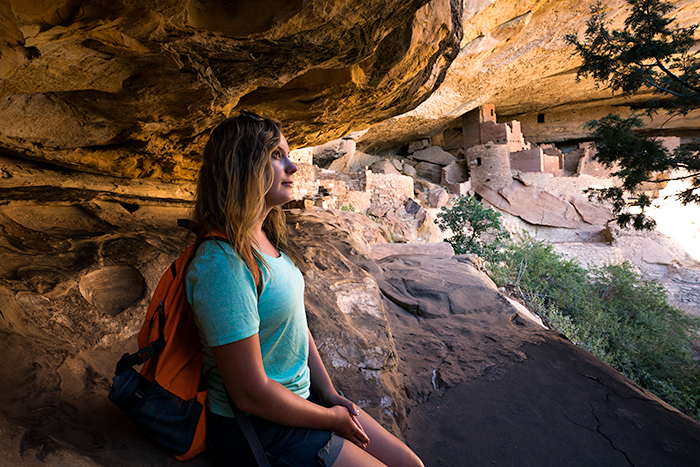
Whoo-hoo! Nobody else in the shot ‘cuz we were 1st in line on the Cliff Palace tour! 35mm
8. COMPOSE your shots with a clear subject in mind.
A landscape with a bunch of trees and sandstone mountains is missing a subject. What am I supposed to be looking at? Are cliff dwellings hidden somewhere–if so it’s too hard to see and your viewer goes quickly on to the next pic.
Ask yourself, what is the subject?
Can you identify the subject and describe why you’re compelled to shoot it in a short sentence?
Consider focusing on one feature that intrigues you at the cliff dwellings, and place that structure in the rule of thirds (on an imaginary tic-tac-toe grid) for more impact.
In this shot, the window is clearly my subject. And I’m compelled to shoot it because it represents a portal into a past world where people once lived within these rocks…
![]()
![]() Also look for leading lines that help draw your eye to that subject.
Also look for leading lines that help draw your eye to that subject.
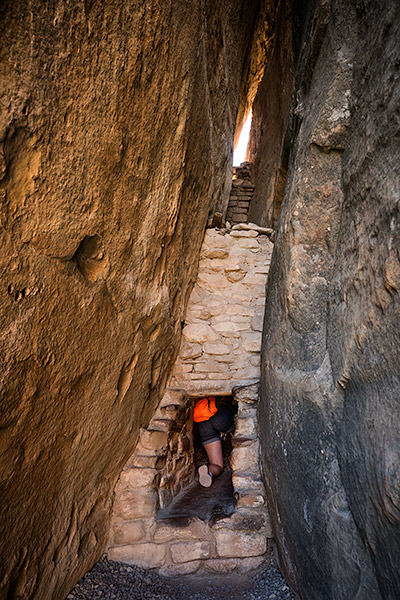
9. Use framing.
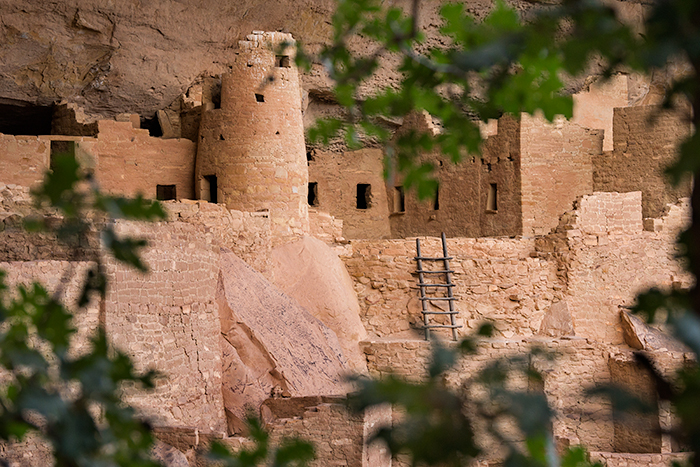
Cliff Palace, Mesa Verde National Park, Colorado
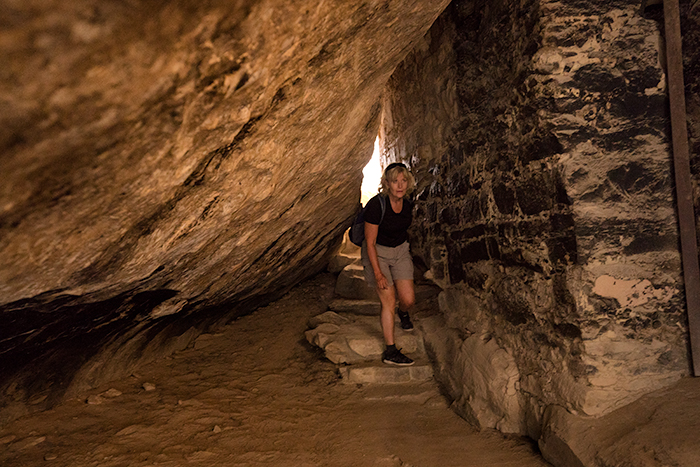
Shoot through tree leaves. It creates a little mystery, as if the viewer is secretly watching this hidden community. Or shoot through a window to get a glimpse of people taking a tour. Lots of options possible, from the tunnel at Balcony House, to the doorways and rock overhangs. Have fun and be creative!
![]()

![]()
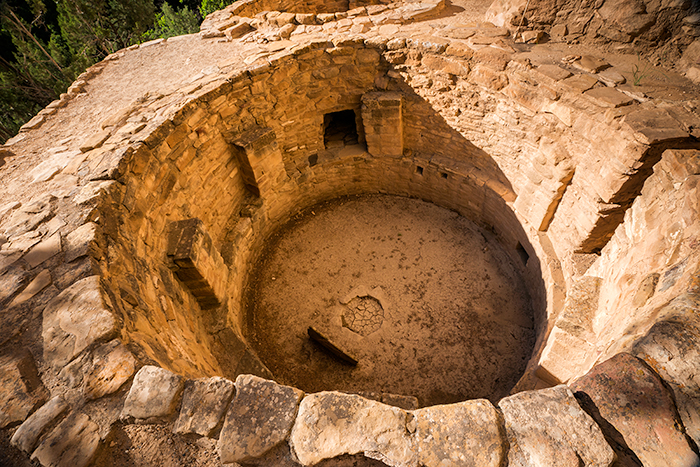
10. Show features in situ.
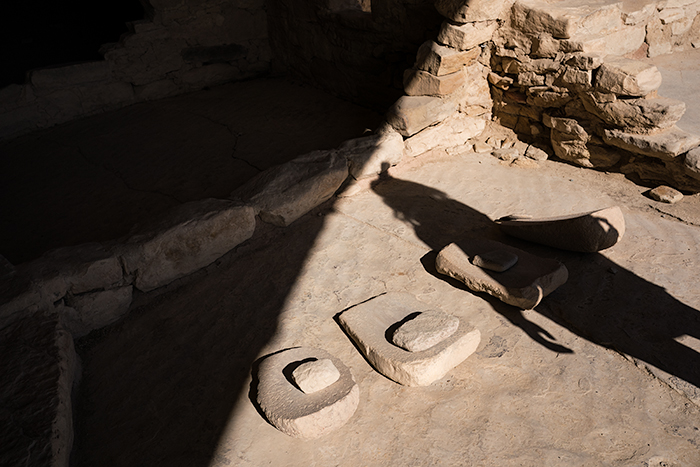
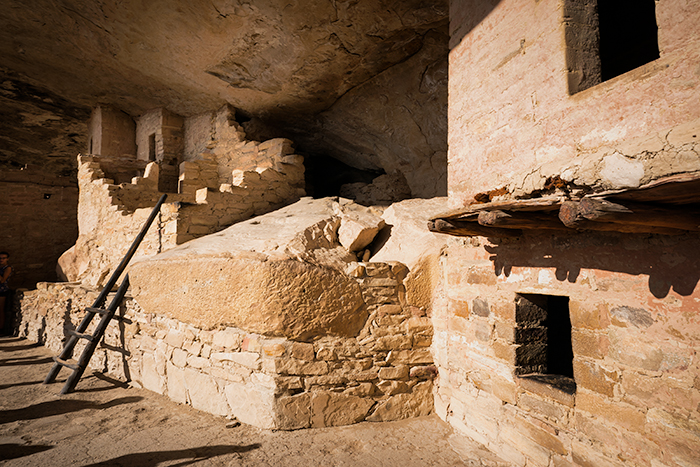
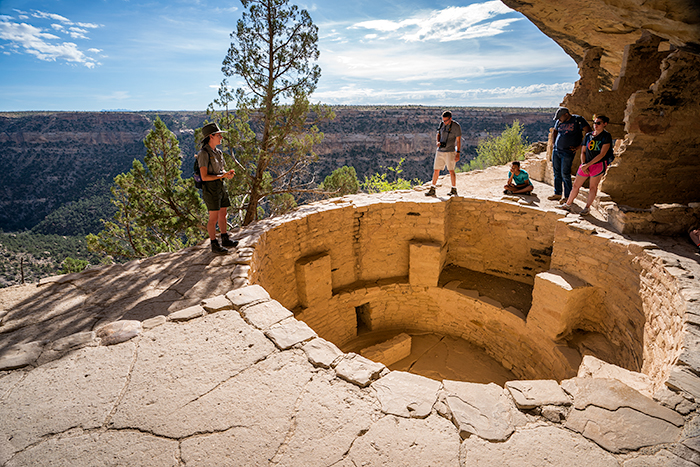
Think about it. What fascinates you about a place? Identify it. Then think about how you can compose the shot to illustrate that. For example, the kiva was important to this civilization. It’s fascinating because we don’t really know what it was used for–ceremonial? religious? social? (it does look like a giant hot tub). And the fact that it was located on the edge of cliff, half-submerged in the ground, adds to the intrigue.
So why would I want to photograph it like this…
![]()
![]() …if the setting is what makes it so interesting?
…if the setting is what makes it so interesting?
I’d certainly want to show it in situ, in its original position, in the context of the surroundings. Seeing a wider perspective helps appreciate how important it must’ve been—so prominent and visible—but also how scary it could’ve been for people prone to sleepwalking, stumbling home a little tipsy, or parents lunging after wobbly toddlers learning to walk…
![]()
![]()
![]()
![]()
Wide angle lenses, 16-35mm, allow you to capture kivas in a fairly tight space, and help emphasize the importance of this feature.

Balcony House kiva
Post-processing pictures
Two objectives come into play when post-processing my pictures: fix or enhance the shot. After photographing Mesa Verde cliff dwellings you’ll likely need to tweak exposures.
Camera Raw in PhotoShop (similar to Lightroom) is where I do most of my edits. There’s numerous ways to process pics—but this is my general process:
- Fix exposure: Play with the black and exposure sliders to stretch out the histogram.
- Fix contrast issues: Play with shadow slider to lighten dark areas or bring down highlights slider.
- Adjust color balance temperature. (Example shot below was too golden for my taste, so I reduced the yellow.)
- I typically do not adjust saturation, vibrance, contrast, clarity, sharpening or noise globally to an entire image. (default setting for Contrast in PShop is 25.)
- HSL/grayscale (4th one on tab): fine tune any color preferences. Luminance is what I typically use to brighten or reduce brightness of a specific color, like orange or yellow, or slightly darken blues in the sky.
- Adjustment brush: this is where I selectively paint in an effect such as adding a gradient, adding a tiny bit of clarity to stones, or darkening the sky, etc. It is a space to play like a painter, gradually adding little bits of luminance or color or shadow.
- Fx tab: add slight vignetting (if at all), adjust sliders for amount (-7 to -15), feather, and roundness.
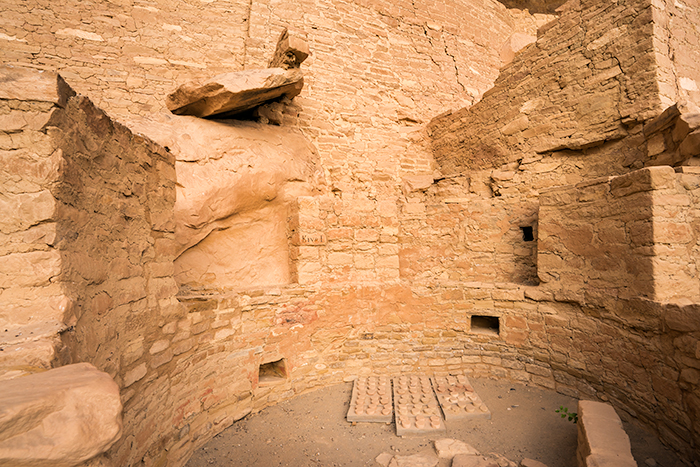
As shot: kiva is too dark, ruins in distant alcove are lost in shadows, and the scene is too unbalanced throwing the emphasis on the tower and T-door.
![]()
![]()
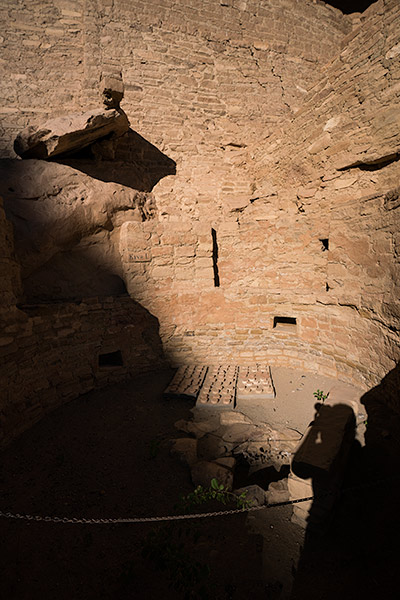
After a few edits in Camera RAW & minimal adjustment in Nik’s Pro-Contrast: creates a scene more evenly lit with equal emphasis to structures.
![]()

![]()
In PhotoShop:
This is the place where I crop, fix wonky horizons, clone out any dust spots and fine tune the contrast.
Sometimes part of an image looks washed out and flat. Try this simple fix: duplicate your layer, change the blending mode to multiply, add and invert a mask and selectively paint back in with a soft brush at low opacity. Or add a curves layer and sample two parts of the flat subject to stretch in curves, add and invert a mask and paint back in.
To make the subject pop, contrast can be added by hand using dodge and burn tools, adding a curves layer, or adding contrast with Nik Color Effex 4 filters. (There are a few contrast filters—Tonal Contrast (HDR-like), Pro Contrast, and Color Contrast. Just a few clicks and it’s easy to go overboard, so remember that less is more!)
I gravitate toward using Nik’s Pro-Contrast filter. I’ll play with the sliders: Correct Contrast (usually 3-10%) and Dynamic Contrast (usually 10-15%). You can protect the highlights/shadows too. And if you hit the + button, you can selectively add the contrast to just a certain area on your image. Happy with the effect, hit OK to save. Once back in PhotoShop I make and invert a mask on that layer, and selectively paint the effect back into the image with a brush, and decrease the opacity and the fill.
A little secret I discovered years ago…change the blending mode to Luminosity instead of Normal to eliminate any color cast when adjusting the contrast. Otherwise, the image’s color can become saturated and unnatural looking.
Another little trick to try if an area is lost in shadows: in PhotoShop’s upper tab select Image: Adjustments: and scroll down to Shadows/Highlights. Then adjust the sliders accordingly for amount, tonal width and radius until you like the effect and hit OK to save. Again, as always…add a mask, invert, and paint in that effect to just the area needed selectively, reducing opacity and fill.
You’ll notice that I’m not applying filters or effects globally to any image, but rather am always adding masks so that I can paint in the effect of whatever it is I’m enhancing to just a select portion of the image and then fine tuning the opacity.
The other filter I tend to use on Nik is the Darken/Lighten Center. You can pick where you want the highlight to go on the image (default is set to 20 but that’s too high for my taste) and then darken the edges of the frame to your liking. On my example shot I placed the center of the highlight on the distant ruins under the alcove at 8%, and darkened the edges to -30. You can play with the size of the highlight center and shape too.
And that’s about it.
By the way, not all images can be “fixed” in PhotoShop. For example, take the overview shot of Cliff Palace taken at midday at the beginning of the post. Applying the steps described above, plus trying Nik’s Color Contrast filter, this is the best I could do (but I still don’t like it). Nope, not a keeper. Just gives me another reason to go back—to shoot it right in good light. (That, plus hiking to Step House & Long House, which I didn’t have time to visit. And maybe then, hopefully, Spruce Tree will be re-opened again…lots to go back for!)
![]()
![]() It’s obviously best to shoot the ruins when the light isn’t directly overhead, causing the structures to appear rather flat in a landscape of contrasty foliage. But sometimes you don’t have any other choice. Storms rather frequent in summer afternoons can cancel out sunset attempts. And the loop road to access the observation area is one-way and takes up to 45 minutes to drive, and is closed from dusk to 8am, the time photographers would love to be there!
It’s obviously best to shoot the ruins when the light isn’t directly overhead, causing the structures to appear rather flat in a landscape of contrasty foliage. But sometimes you don’t have any other choice. Storms rather frequent in summer afternoons can cancel out sunset attempts. And the loop road to access the observation area is one-way and takes up to 45 minutes to drive, and is closed from dusk to 8am, the time photographers would love to be there!
Photographing Mesa Verde cliff dwellings certainly isn’t easy, especially in harsh sunlight. But with a little thought and planning, you can come home with pictures that capture your subject in a way that conveys what you found fascinating about the site. For more info about the park, check out the Mesa Verde National Park website.
To check rates for staying inside the park check out the Far View Lodge.
You may be interested in reading my practical tips for Visiting Mesa Verde: Know before you go!
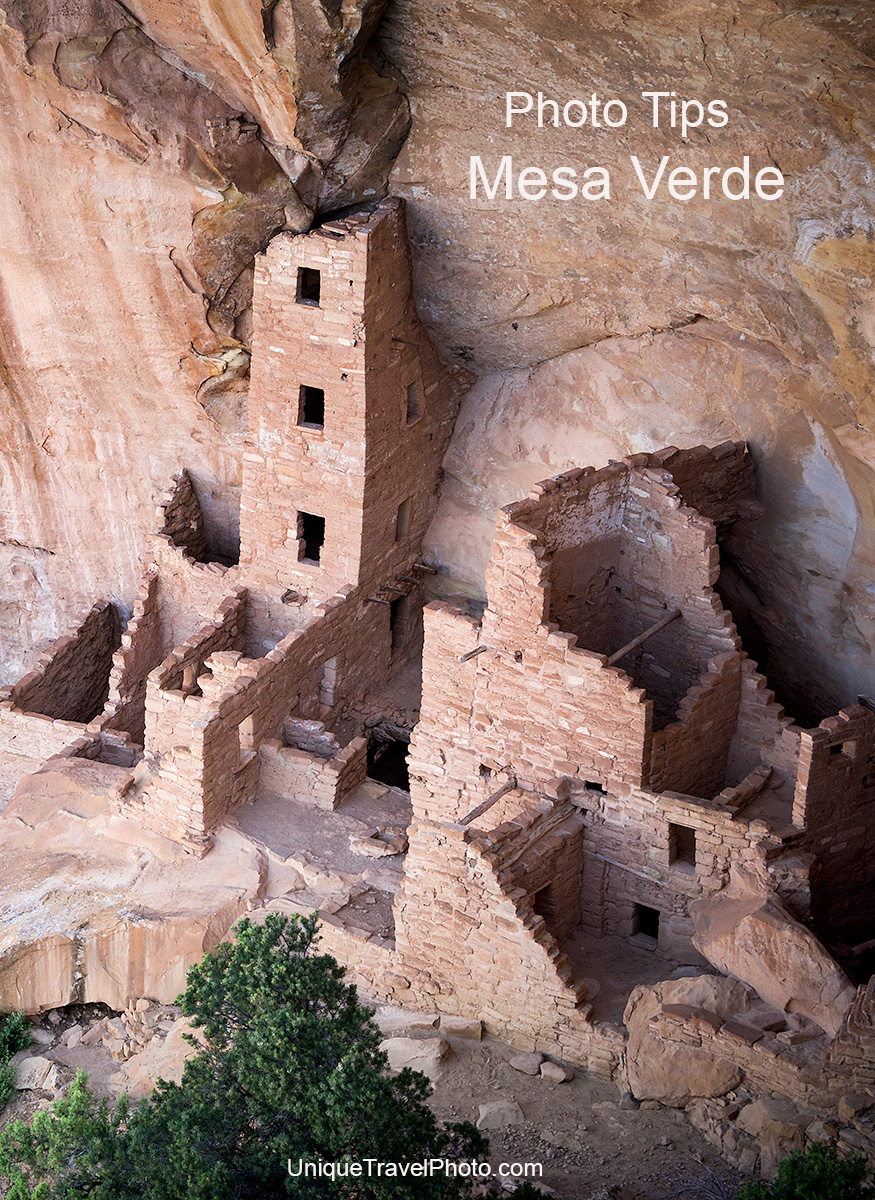
Save this post for later, Pin it!
![]()
![]()
![]()
Laura - Thanks for sharing your tips, but, mostly for the amazing photos. I now want to make the trip to Masa Verde.
Kim - Thanks kindly, Laura! I hope you grab the chance and go.