.jpg)
There are over 250 waterfalls and countless scenic river overviews in the vast 2.22 million acre Yellowstone National Park. So if you’re naturally drawn to waterscapes, there are plenty to photograph! I’ll admit that I’m not one that usually seeks out either…especially in Yellowstone, where I’d rather be photographing frosty bison, stark lodge pine trees or vivid mineral springs that are randomly unveiled in misty steam. Time completely disappears when I wander around those geyser basins. Each bend brings new surprises, and my camera goes into overdrive trying to capture the surreal surroundings. Pretty waterfalls or rivers, for me, lack the same appeal. I have to work harder to “find” the best composition. So where do I start?
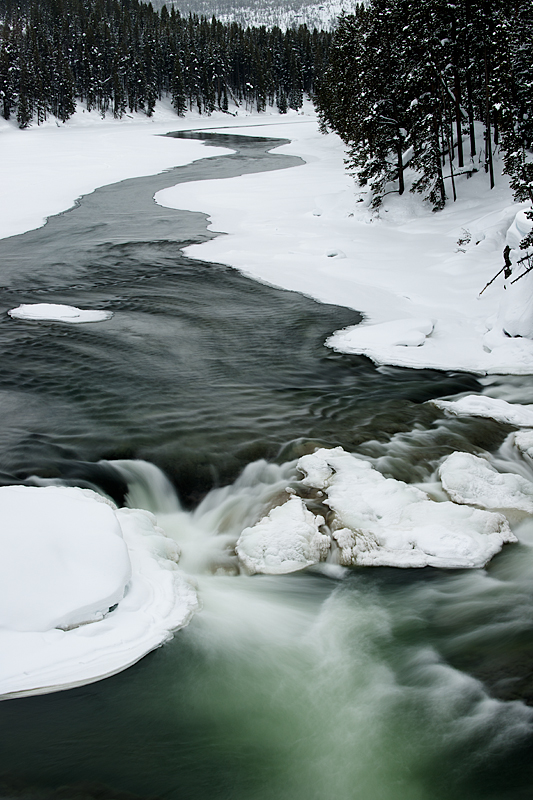
First, I pinpoint the subject: what is it? (Obviously the river here.) Then determine: what’s the exact focal point, and how is it best conveyed? For me, in this scene it’s the rapids, the area of highest contrast in color, movement and form. The colorless sky didn’t add anything to enhance the subject, so I cropped it out. The trees created a nice background mirroring the dark colors of the river, but became a distraction for me in the foreground, and began to “compete” with my subject. So I zoomed my lens until it, like the sky, disappeared from my frame. Then I simply composed to eliminate any additional distractions on either side, whether they were rocks or trees in the snow. I wanted to create a rather intimate landscape, with a clean focused subject. That’s basically went through my mind.


Here is a vertical view of the same. I simply placed the focal point in the lower third of the frame, letting it create a vague diagonal line. What I don’t like about the image is that the water falls off the left side of the image before hitting the rapids. I find that distracting and disturbing. But the river was too wide to keep the bank contained within the frame. And I did not want to widen the view which would’ve created even more distractions–the featureless sky, dark spots of random rocks and trees.
Speaking of distractions, take a look at a 70mm view of Yellowstone’s Grand Canyon.

.jpg)
While I like to include diffused objects out of focus in the foreground of portraits, wildlife, or still lifes to create depth and a strong selective focus, I generally do not like to do so in landscapes. At least not in a scene such as this. I find these trees too distracting, as my eyes keep going over to the edge rather than the center subject, the river. Yes, I could’ve used a greater depth of field and kept everything sharp, from the trees to the river. But, what is the subject? The river. And the focal point? For me, it’s the contrast of the steep snowy banks with pointed pines and reddish-pink mineralized earth that descend to the 24 mile river below.


To narrow this view, I cranked my 70-400mm lens up to 400mm to crop out the distracting foreground trees and zoom in on my subject. I played around with different angles, and zooms, but preferred this vertical to others, including horizontals, in the end. I liked the strong line the river created snaking through the frame. The simplicity seemed pleasing to my eye. But everyone has different tastes. Most wouldn’t dream of photographing a grand scenic like this with a zoom instead of a wide angle view. In fact, I saw plenty of people trying to capture the Grand Canyon that day with a 17-35mm lens. I guess I’m just odd. But I prefer a more intimate landscape.


f27, 0.7 sec, ISO 100, Vari ND filter
This is about as intimate as you can get with a waterfall…zooming in to a tiny, tiny part of a scene. Of course, I still had to make decisions about how to compose the scene. I like to capture waterfalls from the side rather than the front, to create a diagonal line in the frame. The focal point of the subject, for me, was the way the water hit the little pool and bounced against the trio of rocks. All lines lead to the pool, even the mineral lines in the reddish rock. And the trio of rocks formed a nice balance. Now that I had locked down my composition, I had to choose my shutter speed.
To create that silky smooth flow, you need a long exposure. Thus a long shutter speed of 1/15 or longer. In the middle of the day that can be somewhat difficult to do. First, you can change your ISO to 100, and increase your DOF to f32. Chances are, when you meter on the water it will be overexposed, too bright for shutter speeds under 1/15 sec. You can use a 2 stop neutral density filter, or the handy dandy Singh-Ray Vari ND filter that allows you to dial in up to 8 stops. That’s what I did here. In manual mode, I set the aperature to f27 and rotated the Vari ND filter, screwed on to the front of my lens, until the scene became darker and the little metering dial read +1.5 when spot metered on the water. The corresponding shutter speed was 0.7.


f8, 1/125, ISO 400
But not everyone likes a silky waterfall. Including my mother. I’ll never forget the time I drove up to northern Minnesota, past Duluth, to spend an afternoon photographing her favorite waterfall. I was so excited to surprise her with the images–only to be surprised in return by her reaction! Her face was crestfallen. “But that’s not how it looks in real life!” She had no interest in staring at prints that didn’t resemble what she saw in person. “Don’t you have any that show the fast water and look realistic?” Nope. Not a one…
So every now and then, remembering her disappointment, I try to include a shot or two of falls at the height of their action. For this shot, I changed the ISO to 400, removed the Singh-Ray filter, and chose a fast shutter speed of 1/125 to capture the chaos. Or, (ahem), the energy. Like it, ma?
I understand the appeal of seeing the energy in a scene. Really I do. The silkiness of water in a scenic becomes almost trite after awhile. Overdone. Too postcardy. So just for fun, I decided to combine the two images.


Kinda a nice compromise. Silkiness plus energy! And rather simple to do. I opened up both images in PhotoShop CS5 and dragged the silky image over the other photo. Then I created a mask and with a black brush painted (removed) part of the silky water to reveal the pulsating, forceful water underneath. No formula where to paint, just do what looks pleasing to your eye. I tried to analyze where the water would naturally be the most chaotic.
Which one do you prefer???


.jpg)

Ken Lee - I think I prefer the silky waterfall photo best, but of course, it depends on what you are trying to capture.
I stumbled across this blog from your Unique Photo Tours website, as I am contemplating a photo tour to Iceland, by the way. It’d be my dream tour, a once-in-a-lifetime splurge, assuming I can drum up enough cash.
Cool blog.
admin - Thanks, Ken. Iceland is a dream tour, and we hope you can join us! By the way, you may want to check out an earlier blog entry on Shooting Geothermals by Moonlight We will be shooting here again on our August tour during the full moon.
Tim - The pics of the water falls as well as the snowy rivers are looking fabulous…..the way these pics are clicked are really marvelous…
Jewel - The pics are great… some of best best pics i have seen about waterfalls..So natural…Keep it up