
.jpg)
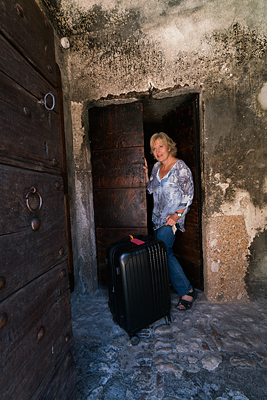

Morocco Kasbah
I really love flash. For me, it’s what transforms a photograph from something one takes into something one makes. In otherwords, you command a bit of control over the situation.
In the image above, the Moroccan sun was well past mid-day as evidenced by the eastwardly marching shadows on the kasbah.
But though the sun was well past noon, it was still powerful and bright. There was plenty of light to make an exposure, but the contrast would’ve been very high on Hassan’s face and I would’ve been at the mercy of Mother Nature with regard to my Subject and Background exposure.
Enter… the flash. When we add a flash into the equation, we suddenly have a verrrry interesting power. We can now control the foreground and background exposures independently of Mother Nature’s limitations.
In a nutshell, here’s how to master indepent control of your foreground and background exposures.
1. Determine your camera’s maximum sync. speed. This varies by model, but is usually somewhere between 1/200th to 1/250th of a second.
The sync. speed is the maximum shutter speed you can shoot at and still make a flash photograph.
Sync. speed is also the bugaboo that confounds flash use in the brightest time of day. More on that later.
2. Put your flash on Manual Control Mode. This means that YOU will control the power setting on the flash. When your flash is in Manual mode, you will see power settings of 1/1(full power), 1/2(half power), 1/4, 1/8, 1/16, 1/32, 1/64, 1/128.
Not all flashes go all the way down to 1/128th power, and some have settings in-between these settings.
If your flash says it’s in E-TTL or TTL or S-TTL mode, you are not in Manual Mode. Consult your flash handbook.
3. With your flash turned OFF, set your Shutter Speed to the sync. speed (or SLOWER), and adjust the aperture so that the background is exposed the way you want it. In the photograph above, I have the background exposed about 2/3 of a stop darker than normal.
It may happen, if the ambient light is too bright, that you are not able to get the background exposure dark enough and still keep your shutter speed at or below the maximum sync. speed. (This is the bugaboo I mentioned earlier.)
If this happens, you have three options:
A. Wait until it becomes a bit darker outside.
B. Put a neutral density filter on the front of your lens to artificially darken the ambient light.
C. Lower the ISO setting on your camera. If you’re at ISO 200, try ISO 100 or possibly even ISO 50.
4. Once you have a proper background exposure, turn on your Flash. Begin with a power setting of 1/4th.
Take an exposure and see if the flash properly exposed your subject.
If your subject is still too dark, increase the flash power.
If your subject is too light, reduce your flash power.
You have just made a competent flash photograph!
————————————————————————————————————————————
The Flash operates so much faster than the Shutter Speed that changes in the Shutter Speed have little or no effect on the exposure of our foreground subject which is being lit primarily by the flash.
What does this mean? —
Once we have our background exposure set and our flash power properly dialed-in…
we can alter the background exposure simply by changing the Shutter Speed.
Changes in the Shutter Speed will have very little effect on the exposure of our Subject, since it is being lit primarily by the Flash which doesn’t really care what the Shutter Speed is (as long as it’s at or below the sync. speed).
In the words of Charles Schultz (through the persona of Linus), “The theological implications alone are staggering.”
SHUTTER SPEED allows us to separate the background exposure from the foreground exposure. WOW! That’s exciting. Bye-Bye Mother Nature, hello Master of Light.
And, we can alter the Subject exposure simply by changing the power output of our flash unit.
Okay, let’s put this to use.
![]()

![]()
I love to take environmental shots of people with wide angle lenses. It shows them. . . well, in the environment.
However, that means we have to expose both the subject and the environment.
When we depend on Mother Nature, we might have to wait for the right time of day. But now we know how to use our flash and separate the exposure for the background and foreground. We can shoot whenever we like.
In this photo of my friend Scott, I wanted to show some of the rock formations around us during our hike to the Arizona land form popularly know as “The Wave”.
Here are the steps I took to make the photograph.
1. I dialed in an exposure for the background that was about 1 stop darker than normal. I like a darker background to help separate my subject from the background and to make it a bit more dramatic.
2. I turned on my flash and put it in Manual Mode, starting with a flash output power setting of 1/4.
As you can tell, it’s bright out there – noon in Arizona is not a low-light time of day. In order to
achieve 1/250th second shutter speed (my Nikon D3’s sync speed), I had to use a tiny aperture of f/16.
Well, a tiny aperture means you’re going to need a lot of flash power to illuminate your subject. I tried full power
(1/1). And still it was not enough. So I did the only thing I could do. . . I added another flash.
With two flashes, I was able to supply enough power at f/16 to illuminate Scott successfully, and you can tell
from the image that he was loving every minute of standing there being blasted with flashes of light.
In a nut shell, set your camera in manual exposure mode and dial in an exposure for the background so that your shutter speed is at or below the sync. speed.
Then turn on your flash — start at 1/4th power — and take a test exposure. Adjust your flash power up or down as needed.
Adjust Background Exposure with Shutter Speed.
Adjust Subject Exposure with the Flash Power setting.
That’s the process. Down and dirty, but very effective . . . and fun!
Give it a try. Soon you’ll be making images you never thought possible.
gnohz - Thanks for your guide!
It was very useful! First time I learnt that I could control the exposure for the background and subject separately 🙂
Esclipse - Enjoyed every bit of your blog post.Much thanks again. Will read on…
Dakota - Hi Dave, wanted to say that was the easiest and best explanation for Fill Flash Ive come across. Thanks so much! Cant wait to get out and shoot. 🙂 Dakota