
.jpg)
![]()
![]()
Night skies are fascinating to observe. Even if I can’t identify all the constellations or galaxies like David can. I’m particularly mesmerized by the rings of Saturn when seen through a powerful telescope. And close up images of planets and the colorful swirling nebular clusters posted on Hubblesite.org. They blow me away. There’s a whole universe up there!
But mere mortals with a DSLR camera can capture the night skies too. Constellations like the Big Dipper or the Milky Way Galaxy can be photographed in a single image. But star trails are a little trickier. A certain amount of luck is involved. Skill. And magic… ‘cuz you never know what you’ll “see” until later.
Here is how I turned a winter night scene near Two Harbors, MN on Lake Superior from this:
![]()
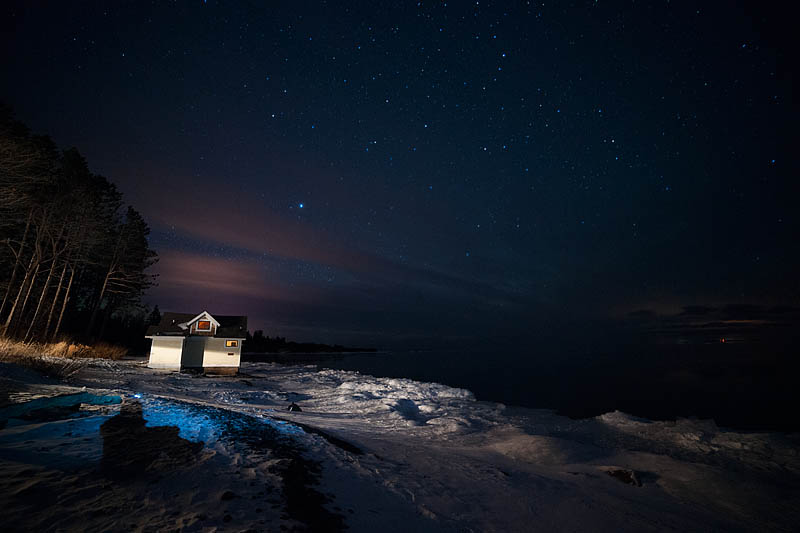
![]()
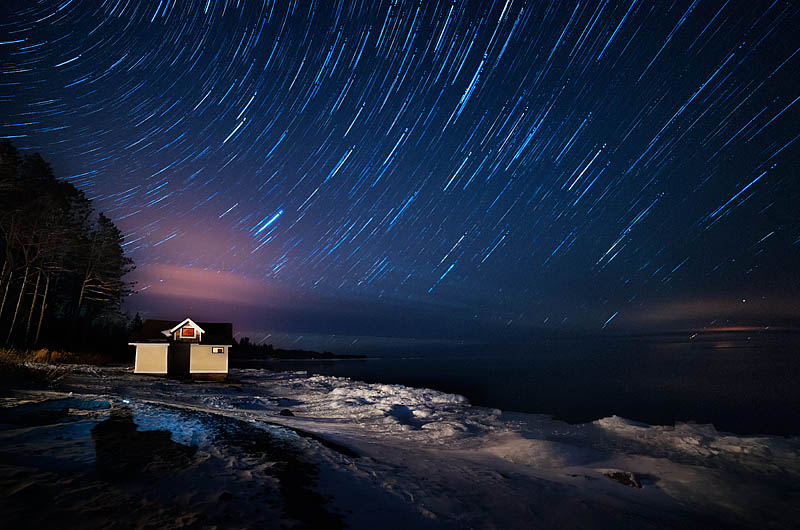
to this:
![]()
![]()
All it took was a dark location, moonless sky, DSLR camera, intervalometer, patience (30 min minimum for one picture) and perseverance (-40 F cold made me fight to stay outside, especially when my fingers were so numb I couldn’t push buttons on my headlamp or camera).
Some information to consider before heading out into the dark…
Equipment:
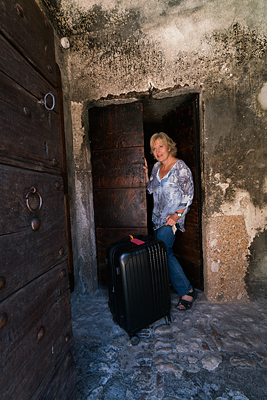
Rokinon 14mm lenses are great for capturing stars and the Milky Way because the aspherical lens will show the stars as round instead of elongated (known as coma), but when capturing star trails the shape of the stars doesn’t matter so any fast lens (f/1.4 to f/2.8) will work fine. (Surprisingly, many expensive prime lenses cause coma, or elongated spaceship looking stars, yet the Rokinon lenses are inexpensive and produce great stars. Try one from BorrowLenses.com!) Make sure you turn off the noise reduction in your camera, as it is necessary to keep shooting instead of waiting for the camera to run its noise reduction process which takes as long as the shot took (so if your exposure was 30 sec you’d have to wait another 30 sec before you could shoot again). Put in a fully charged battery, and stash an extra one under your coat. To keep your lens from fogging up in the cold, it’s also a good idea to open up one of those thermal hand warmers and drape it over the top of the lens (or attach it with a rubber band). Bring a flashlight. Wear a headlamp. And use an intervalometer to make life easy (Vello wireless shutterboss is what I use, around $100, but it is built into some Nikon cameras and there are also apps for your iphone available too). An intervalometer works great for capturing star trails because you can program the device indoors, ahead of time, and set it up to trigger 60+ shots of a 30 second exposure shot fired repeatedly (with a 1 sec delay between shots) for half an hour. While it does its thing, you are free to jog in place to keep warm (especially fun on slippery ice), experiment with light painting objects or landscape features in the foreground with a diffused flashlight on low power, or even put yourself in the picture for the duration of one 30 sec exposure (like I did above).
Calendar:
Dark skies needed, so avoid the 7 days around the full moon. A moonless, clear and cloudless night is perfect. And choose a place where there are naturally dark skies so that light pollution from a city won’t interfere. In this shot, even though I was 30 miles from the closest city to my south, there was light pollution from lamp posts lighting the paths around the cabins where I was staying. There are apps like Night Sky and Photo Pills that I also use to “see” the presence, location and direction of the moon, sun and stars, and Milky Way for any date you plug into your iphone. Super handy for planning your night shots in advance!
Direction:
If you want circular lines of the stars rotating, aim your lens at the north star. But if composition is more important and you found a cool foreground subject, let the stars swirl where they may. You won’t know what the final result will look like until you merge them all together later at your computer, but that can be part of the fun.
Composition:
Scout the location during the day and select something in the foreground to convey a sense of where you are. Could be a silhouette of a large rock formation, a couple of lawn chairs or something more significant.
I chose this little cabin sitting on the frozen shore of Lake Superior to be my focal point, as it was reminiscent of my early summers spent on the North Shore with my family growing up. I composed the scene to place it in the lower left third of the frame. Then tried my best (in the dark!) to include leading lines–or the snow on the shore to the cabin, some water from the lake (for possible reflection which didn’t happen), and plenty of room in the sky for the trails to appear.
Capture:
When attempting to capture star trails, you have two choices. To either take several shots and combine them in PhotoShop or take one veeeery long exposure. I prefer to take 60+ shots, using my intervalometer, and combine them. This allows me to experiment with lighting the foreground during a few different shots. I can later decide which one I like best, use that as my base background layer, and mask out the foreground in the other frames when combined. Same is true for being able to mask out the foreground in single shots that are ruined when car lights, your buddy’s flashlight, or your neighbor’s house lights suddenly blast your frame.
For star trails I usually set my ISO to 1600. (But if skies are especially bright I’ve also had success using ISO 800.) The aperture should be wide open to allow the stars to be as bright as possible, f/2.8 or 3.5. (If shooting f/1.4, use ISO 400; f/4 use ISO 3200.) Focus on infinity to capture the sharpest stars, or focus on the main subject in the frame and let the stars trail all around. Personally, I like focusing on the subject in my foreground. Aim your flashlight beam to shine on the subject to set your focus (magnify in live view or use autofocus), then set to manual focus before you begin your many exposures. I set my shutter speed to 30 seconds. Don’t delay taking the next shot (set up interval of 1 sec delay on the intervalometer) as delays create dashed lines instead of smooth lines in your final star trail image. If not using an intervalometer, you can trigger your 60 shots manually using a cable release. You just have to remember how many shots you take, as it gets rather monotonous clicking, standing, and waiting while counting over the course of half an hour. Trust me, I’ve tried it when my intervalometer failed–I quickly lost track of the shots (frozen, sleepy brain) and came up 15 short. You want to capture at least 60 shots to create star trails.
Remember that each picture will require 30 minutes to shoot. So plan accordingly. If you have a few ideas in mind, start with your best idea first, as sleep deprivation and boredom can set in and convince you to go back in. Plus the freezing temps on subzero nights can eat up your batteries and shut down your equipment. Not to mention your numb fingers and toes…
Processing:
Find your 60 identical files. Look carefully as it is easy to include one that is a little “off” as you may have moved the tripod to find the best composition. I like to select all identical files and mark them with 5 stars. Open up the first image in Camera Raw (or Lightroom) and adjust the color balance. Play around with the slider until it achieves the blueness you desire (2800-4200). Adjust exposure, blacks, whites. Can add contrast and a bit of clarity to taste, and remove color noise here or wait to do selectively in PhotoShop. Hit done. Then select all other identical files, right click mouse, hover over Develop Settings and select Apply Previous Conversion. Now all the 60+ files will match. Still selected, to up to the toolbar and select Tools: PhotoShop: Load Files into PhotoShop Layers. Go grab a cup of coffee and wait for PS to open each of the layers…into one gigantic file.
In PhotoShop:
Scroll through the 60 files to find the one with your favorite foreground (if you experimented with light painting, etc) and drag it to the bottom as your background layer. (I chose my background layer to be the shot where I added myself into the last frame, sitting in the snow looking into the sky wearing a headlamp that illuminated the area beyond me.) Then click on the eye of all other 59 files so you can work on the bottom layer. Clean up and color correct. My first step was to fix the distortion from using a 14mm lens. Then I cleaned up the exterior of the cabin as there was a deep shadow across the wall, removed a red beacon shining in the water, darkened and desaturated the yellow trees and branches on the left side of the frame, and finally desaturated the blue light from my headlamp that was too intense on the snow.
Once you’re pleased with the bottom background layer, go up to the 2nd file (the layer directly above the bottom file), click on the eye to activate it, then change the blending layer to “Lighten.” If you don’t like the foreground you can simply mask out the entire foreground (which is what I did for all subsequent files above my background layer), clone out errors, OR simply leave it alone if it matches your background file and doesn’t add too much light. Do this same process for each subsequent layer, making sure to change the blending mode to Lighten for each layer. And watch the magic appear!
Having completed this process for all 60 layers, you should now see star trails appear–either circling overhead if the lens was pointed directly north, or stars falling in semicircular lines across the sky if your lens was pointed in a different direction. Sometimes the composition is such that you cannot capture the north star behind the foreground you chose. And that’s where luck comes in, because you won’t really know what the star effect will be until you process all the 60+ files in PhotoShop! Faint color barely detected in a single frame also become more vivid with the stacked files.
![]()

![]()
This is my computer screen with all 60 files opened in PS. Note the blending mode above is on Lighten. Illustrative only–I already flattened my actual file where I had created a mask for each of the 59 layers (above the background) to paint out the foreground so I only had to “fix” the background layer (eliminate the light spilling over into the immediate foreground, color correct, desaturate, darken, etc).
Once merged, SAVE! It is easy to spend a couple of hours processing a single image and then PS suddenly crashes and you lose everything! So SAVE. Often.
Final edits depend on your personal preferences. I correct color noise (Dfine 2.0 program) then open up Color Efex Pro 4 and try different effects–color contrast, pro contrast, tonal contrast–to apply selectively to the image by creating a black layer mask and brushing in the effect (white brush). In this image, I used pro contrast effect, adding around 10 on the dynamic range and 7 on the correct contrast, and applied it selectively on the image. My final step was to dodge the dimmer stars (setting around 3) to brighten them in the sky.
And that’s it!